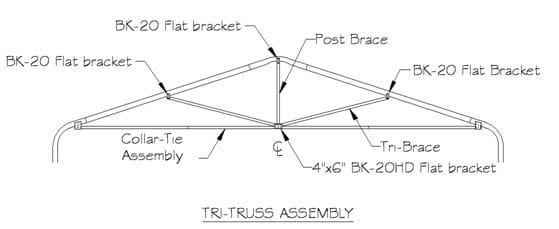
Step 4 in a 24 step video series that shows you how to assemble the truss system when installing a Sierra model Absolute Steel building, America’s easiest to install metal building system.
If your building is less than 20’ wide, and assuming you’re not in an area with excessive Snow Loads, you’re probably not going to have truss braces. With few exceptions, our 20 foot wide structures will require truss bracing and any buildings wider than 20 feet will require truss braces. Absolute Steel buildings have three different styles of trusses based upon the different loads that must be achieved for various the parts of the country.

For this demonstration we’re installing our Tri-Truss Braces as they are the most frequently used. Again, consult your Assembly Manual for the type of truss your building has.
The primary center collar tie tube on this building has an overall length of 31 ½ inches and is 2 inch x 2 inch tube with reduced ends. Center collar tie tubes can vary in length and size depending upon the size of your building. For example a 40 foot wide building in a snow load area uses a 144 inch length of 2 inch x 3 inch tube. Again, always consult the assembly instructions that are included with your kit.
Next slip one of the 91 1/8th inch end collar tie pieces on each end of the center collar tie and make sure the assembly is straight. Fasten the joints with the TEK or frame screws and attach a left and right collar tie bracket flush with the ends of the collar tie assembly.
Right now I want you to position the collar tie assembly between the side bends. The collar tie must be centered in the frame. Use the joined connection between the rafter and the side bend as a reference point. The measurement from the joined connection to the end of the collar tie assembly should be equal on both sides. Fasten each collar tie brackets to the roof/wall assembly with 12 frame screws. Next we need to mark the center of the peak (the peak measurement is 24 3/8th inches from joined connection to the center of the peak). This where one of those “Sharpie” pens or something else that puts a mark on steel that won’t come off comes in real handy. Now mark the center of the collar tie assembly. On this building the center would be 102 7/8th inches. These will be reference points we’ll use in just a minute or two.
Place the vertical center brace in the frame between the peak and the collar tie. Use your reference marks as a guide. Use a BK 20 or flat bracket to affix the center brace to the peak. Make sure the assembly is straight before you fasten the screws after putting the first screw in. Leave the end which meets the collar tie assembly alone – we’ll get to that in a minute.

Using the center mark on the collar tie assembly, center the 4 inch x 6 inch flat bracket onto the collar tie assembly keeping it flush with the bottom of the collar tie assembly and fasten with two frame screws.
Now you can affix the center brace using frame screws placed through the 4 inch x 6 inch bracket and complete the installation by fastening the remaining screws.
The two diagonal brace pieces are now centered on each rafter with the other end abutting where the center brace meets the collar tie assembly. Use the BK 20 flat brackets to affix to the middle of the rafters and slip the other ends into the 4” x 6” flat bracket that you put onto the collar tie assembly and secure them with frame screws.
The only place brackets are used on both sides (front and back) of the roof/wall assembly is at the peak to vertical connection.
We’ve now got the first Wall & Roof Assembly completed along with its Truss Brace Assembly so we’re going to proceed with making all of them for this building kit, leaving the first and last one without truss bracing for the reasons that I just explained.
Video Index:
1. The foundation
2. Eave or corner brackets
3. Roof & wall assembly
4. Truss assembly
5. Hat channel spacing
6. Base rail assembly
7. Anchoring base rails
8. Wall & roof to base
10. Install back enclosure
11. Install front enclosure
12. Door & window frame
13. Girts & hat channel
14. Radiant barrier insulation
15. Side exterior panels
16. Gable end panels
18. Corner trim
19. Roof panels
20. Doors & windows
21. Eave trim
22. Gable trim
23. Ridge cap
24. Finishing touches

