Assuming you ordered an optional window or windows let’s do the trim for that first. On both the door and window trim, we’re only going to be cutting the trim. After we do this, just put the pieces aside with your door and window and after we get the side panels on, we’ll go back and put on the trim pieces. Doing it this way enables you to have no trim in the way when you have to cut the panels for your openings, you can just hold up the exterior panel and scribe it from the inside, where you need to make the cuts.
We’re going to cut the bottom window trim first. Cut the bottom piece of J Trim 2 inches longer than the width of your window. Now cut the two side pieces of J Trim to fit from the top of the bottom sill to the top of the window header.
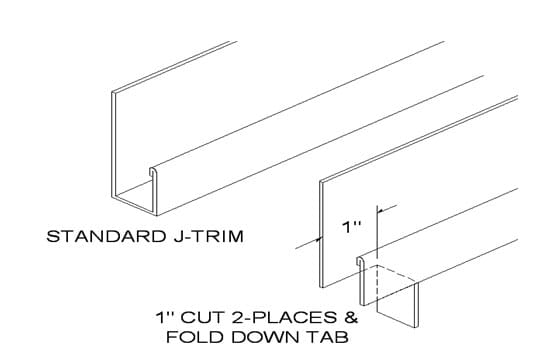
The top piece of J Trim is 2 inches longer than the top width of the window. Now, cut two 1 inch slits at each end of the J Trim so that the center portion can be bent down over the top of the two side pieces.

We’re done with the window trim for now so let’s put them over with the window and cut the trim for the pedestrian door.
Cut two pieces of the J Trim to fit from the floor to the bottom of the top header. Now cut a piece for the top that is 2 inches longer than the width of the door at the header. Cut your 1 inch slits in the ends just as you did on the window trim so that when we put these on, we’ll be able to bend the tab over our side pieces.
For the garage door trim you’ve got two different trims. One is the J Trim which is the same you used on the pedestrian door and if you ordered a window with your building, it’s the same trim we cut for the window opening. The other is what’s called Angle Trim which we will call Door Header Trim. This trim is used to cover the visible galvanized steel of your garage door frameout.
Let’s cut the Door Header Trim first. Cut two pieces of this trim to fit from the concrete slab to the top of the door jam or bottom of the door header. These pieces will trim out the side door jambs. Now cut one the width of your garage door opening. If you have a garage door opening that’s wider than the length of trim, overlap your trim about 3 inches.
Let’s do the J-Trim now and we’re going do that the same way we did the pedestrian door and window, having the piece running across the top two inches longer with a one inch slit cut at each end so that when we put it on, we can bend that slit over the two side pieces.
Now let’s put those pieces of trim aside and we’ll come back to them later.
Video Index:
1. The foundation
2. Eave or corner brackets
3. Roof & wall assembly
4. Truss assembly
5. Hat channel spacing
6. Base rail assembly
7. Anchoring base rails
8. Wall & roof to base
10. Install back enclosure
11. Install front enclosure
12. Door & window frame
13. Girts & hat channel
14. Radiant barrier insulation
15. Side exterior panels
16. Gable end panels
18. Corner trim
19. Roof panels
20. Doors & windows
21. Eave trim
22. Gable trim
23. Ridge cap
24. Finishing touches

