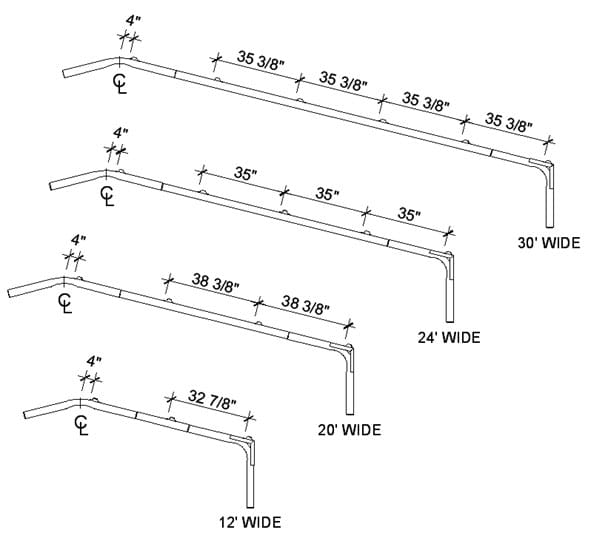
This is step 5 in a 24 step video series that shows you how to space the hat channel on your roof when installing a Sierra model Absolute Steel building.
Up on the roof, there will be horizontal bracing called purlins in the building trade that will be affixed to the rafters. Sometimes these lengths of steel are called subgirts or hat channel—we’ll call it hat channel since its profile looks kinda like a hat.
Right now, while you’ve got the Roof & Wall Assembly on the ground is a real smart time to mark the rafters with the spacing that you’re going to be putting the hat channel on the roof. This will save you having to do it while up on the roof so while they’re there on the ground and handy to get at, let’s get them marked.

This diagram shows the hat channel spacing on various widths of our buildings. As we’re erecting a 20 foot wide building, naturally we’ll use the 20 foot wide measurements and mark those out on the roof/wall assemblies. Just measure the top one out beginning at the edge of the eave bracket and then do the bottom one the same. Now use a straight edge to mark all of the frames in between at these measurements.
Video Index:
1. The foundation
2. Eave or corner brackets
3. Roof & wall assembly
4. Truss assembly
5. Hat channel spacing
6. Base rail assembly
7. Anchoring base rails
8. Wall & roof to base
10. Install back enclosure
11. Install front enclosure
12. Door & window frame
13. Girts & hat channel
14. Radiant barrier insulation
15. Side exterior panels
16. Gable end panels
18. Corner trim
19. Roof panels
20. Doors & windows
21. Eave trim
22. Gable trim
23. Ridge cap
24. Finishing touches

